Welcome on my SharePoint 2010 blog

Hello,

My name's Roy. I'm a dutch SharePoint & BI consultant/architect at Advantive B.V. At this moment I'm busy with some big SharePoint 2010 projects in The Netherlands. In all the projects I've got different roles, like: Business consultancy, Lead Consultant, Architect (logical and technical), Development and Teaching/courses.

Products where you can ask me about are: SharePoint, Visual Studio, SQL Server, PowerPivot, Analysis and Reporting Services, Visio Services, InfoPath, PerformancePoint Services, Team Foundation Server, Office line.

I love to work and to write about Microsoft SharePoint 2010 so, feel free and read/comment my Blogs!

Greetz.

Wednesday, October 27, 2010

Secure Store Service Application in SharePoint 2010 (and BCS example)

Intro

The Secure Store Service replaces the Microsoft Office SharePoint Server 2007 Single Sign On feature. Secure Store Service is a shared service that provides storage and mapping of credentials such as account names and passwords. It enables you to securely store data that provides credentials required for connecting to external systems and associating those credentials to a specific identity or group of identities. It is very common for solutions to try to authenticate to an external system in which the current user is known differently or has a different account for authentication. In such cases, Secure Store Service can be used to store and map user credentials required by the external system. You can configure Secure Store Service so that multiple users can access an external system by using a single set of credentials on that external system.

For example, if a user named Fred has one account on the server that is running SharePoint Server and another in a CRM application, the Secure Store mechanism enables his CRM credentials to be stored with his user profile in SharePoint Server. As a result, if he uses a Microsoft Business Connectivity Services (BCS) solution in SharePoint Server to obtain data from the CRM application, SharePoint Server looks up the Secure Store Service database on the server and provides his credentials to CRM. In in this manner, Fred automatically logs on to the CRM application without having to log onto the CRM application separately.

To provide similar functionality on Microsoft Office clients, Business Connectivity Services provides a Secure Store provider that uses the Windows Credential Store.

In addition, SharePoint Server enhances the Secure Store Service functionality to include a pluggable secure store mechanism that enables you to use alternate secure store providers.

Installation/configuration

First make sure that the BCS service (for the example in this blog) is started and a BCS Service app is created. Also make sure that the Secure Store Service is started (Central admin --> services on server).


1:
Go to the central administration and click under application management on "Manage service applications".

2:
The list with available service applications becomes visible. Click in the upper left corner on: New/Secure Store Service Application.


After clicking on the link a dialog (SPDialog) appears:
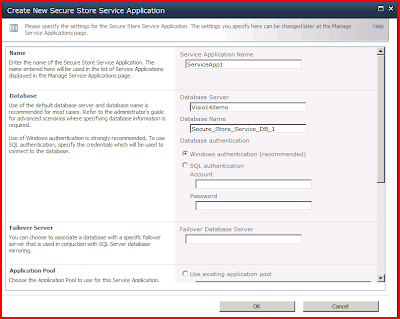


3:
I'll advise you that (for security reasons) you choose for a separate/isolated application pool for the secure store service app (sss) .

4:
Choose a database server and name for the sss and click on OK, the sss and the sss proxy will be created. After clicking on OK you get the message to generate a key first before you can use the service application. This key will be used to encrypt credentials.
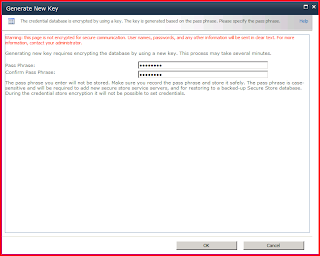


5:
Create the key by clicking in the ribbon on <Generate new key>

6:
The database will also be encrypted with a passphrase key, enter the key and confirm it:


7:
Initially there are no target application in the secure store. To create one click on <New>. An new window will be loaded:


I've chosen a ID called: AdventureWorksID, this is the name of my external system that I want to connect to in my BCS solution.

There are two primary types for creating a target application:

  • Group, for mapping all the members of one or more groups to a single set of credentials on the external data source.
     
  • Individual, for mapping each individual to a unique set of credentials on the external data source.
I've chosen "Group" in this example. Click <Next> and the following screen will appear:


In the screen above you can add fields that are necessary for the credential part. In the <Field Name> textboxes choose you're own label that you want to choose when a sss administrator needs to enter the credentials. If you're credentials are not windows credentials, change this in your dropdown box. You can check the checkbox "Masked" if you want your text to be masked.

8:
Click on <Next> and fill in a administrator for the target application and a member if necessary and click <OK>. You're target application is now created.

9:
Click on your new target application and after that click on <Set credentials>

10:
Enter your credentials in the next screen and click <OK> (notice that the labels of the field names are changed)


You also have the possibility to publish a sss when you're working with multiple farms. To do this click on the secure store service application in <manage service application screen> and click in the ribbon on <Publish>, the following screen will open:


11:
Select the check box <Publish> and copy the urn. For an explanation how to use a service application cross farm see my blog: Metadata cross farm BLOG.

Shortened Real-time Example

1:
Create an external content type with SharePoint Designer. Give the external content type a name and click on the link (see last link in picture below) to discover external datasources:


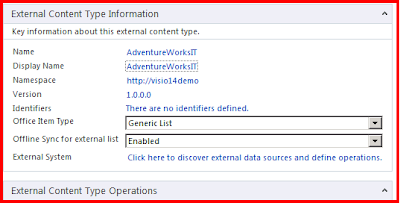
In the popup box fill in your external database server name and database name. After that, choose: "Secure store application Id" and fill in the ID of the target application you just created:


Click <OK>, choose your data and publish/save your external content type to the BCS metadata store.


From the SharePoint 2010 UI create a list based on the external content type you just created and your list is now available in SharePoint based on the Secure Store Credentials.

PS: @SPJanet: Hope this is a worthfull blog for you, otherwise please let me know!

Saturday, October 23, 2010

SharePoint 2010 and Windows 2000 Active Directory

In the last months I've had two installs/configs of SharePoint 2010. In both situations SharePoint is installed on a Windows 2008 R2 server. That's fine for so far, but:

They are both linked to a Windows 2000 AD environment. And I think you can already guess it, that doesn't work Out-Of-The-Box....

The problems you get is that you can't get authenticated in SharePoint and when you think to give the AD user more rights (as well in SharePoint as in AD) you see question marks in front of the user ID (on the Windows 2008 R2 server), the user name/id and the complete SID.


That doensn't look good.... so go and investigate for the solution!

Solution to let SharePoint 2010 work with Windows 2000 AD:

On the 2008 servers - In GPEDIT.MSC > Computer configuration > Windows Settings > Security Settings > Local Policies > Security Options.

Domain Member: Digitally encrypt or sign secure channel data (always)  - Set this to Disable
Domain member: Digitally encrypt secure channel data (when possible) Set this to Disable
Domain member: Digitally sign secure channel data (when possible)   Set this to Disable

Then reboot the Windows 2008 R2 server to refresh the policy settings.

But after all the best solution is to upgrade your AD environment to the latest version.

Wednesday, October 20, 2010

Extending the ribbon: Webpart contextual tabs

This Blog will talk about creating a webpart contextual ribbon tab" in SharePoint 2010 on a high level.

With this solution the tab(s) will be visible when the specific webpart will be on the page.

Create a SharePoint visual studio 2010 visual webpart project with the following ingredients:
  • JS.file
  • WebPart
  • XML-files
The js.file contains the functions and methods to put the necessary tabs, groups and buttons to the ribbon.

In the XML-files you can find the tab and the groups with it's buttons and it's behaviour. In this file you can only find a shortcut to the event handler that will be fired when the button in the ribbon is clicked. In the feature the xml sections will be added to the cmdgui.xml file in the 14-hyve. The ribbon tab is a normal ribbon tab and not a contextualtab (like doc library (documents, library)).

The WebPart contains code in the prerender method to:
  • read the xml-files for the tabgroups and tabs
  • put the xml in the OOB SharePoint cmdgui.xml file
  • put in some code for the event handler
  • Include the javascript file

Thursday, October 14, 2010

PowerPivot: make the end users a BI Specialist

Intro
In most of the organizations Business Intelligence (BI) is a hot subject. Most of the management information is created by the IT-departments (OLAP cubes, reports, dashboard, etc). But the ad hoc information will be created by the end user, and most of the time in Excel (familiar application). This information in these sheets is decentrally managed and stored. The problem with these decentrally managed sheets is the fact that people can make critical decisions based on this information and the organization doesn’t know that it exists.
PowerPivot Client
Microsoft resolves this by giving end users a perfect alternative option using the PowerPivot Client and PowerPivot for SharePoint. Users are familiar with Excel and can make use of Excel and the extended PowerPivot tools by downloading the free add-in from http://www.powerpivot.com.
In Excel you get new options added like slicers, with slicers you can slice and dice through your data in Excel, which Is really powerfull in combination with PowerPivot.
Thanks to PowerPivot pivot tables in Excel are no longer based on cells but on tables like in a real database (datasources that can be easily connected are: SQL, Azure, Oracle, Excel and Atom). The information will be physically transferred to PowerPivot.
PowerPivot makes use of an in-memory engine (called VertiPaqengine) in Analysis Services, thanks to this engine it is possible to analyse and transform the data on the workstation of the end user. To use million rows of data PowerPivot uses column compression. Under the hood the engine is a simple version of Analysis Services. With column compression duplicate values will only be saved once, all the duplicate columns will be saved as a shortcut.
PowerPivotLanuage
PowerPivot has got his own function language called Data Analysis Expressions (DAX). With DAX aggregations can be made dynamically based on relational database concepts and an Excel look-a-like syntax. In your PowerPivotresultset (Excelsheet) you can easily add columns based on the columns of your resultset. The formulas will be entered in the familiar Excel formula box.
PowerPivot Server
Users can easily share their PowerPivot files to publish them to SharePoint 2010 in the PowerPivot gallery. In this Silverlight based gallery all the PowerPivot workbooks will be saved and a thumbnail will be shown. The workbooks will be opened (when installed) via Excel Services. So to view PowerPivot files in SharePoint no client installation of PowerPivot and Excel is necessary.
PowerPivot management
The IT department can see the use of the PowerPivot applications by using the PowerPivot Management Dashboard. Thanks to the dashboard the IT department can see if an application is used ad hoc or permanently. When the PowerPivot application will be heavily used , the IT department can decide to create a “static” dashboard for it.

Monday, October 11, 2010

Failover principal SP2010 service applications

I hope I will help a lot of people with this new blog about the OOB failover principal that comes with SharePoint 2010. Please read the following:

You can find a lot of information about the failover principal for OOB service applications, things like: "It is based on Round Robin...", "if one service app is down, the first available one will be used..." and  "This whole principle is embedded in the application discovery and load balancer service application....".


All of the above statements are true, BUT....How does it really work under the hood....That answer you can find from now on in this blog and the answer is pretty simple!!

There is a timer job OOB within the central administration that checks which services on the specific appservers are up and running (application discovery). If so, it cleans and re-creates the connections/addresses to the working services.

SharePoint will directly act when a service that represents a specific service application is down. Example:

2 servers that have an active metadata service. The services are connected to the metadata service application. When the service on the first service (order of the services for the SP NLB) goes down (or both services go down), you cannot use the metadata tree throughout your SharePoint UI. The load balancer service application will not directly change the address to the other server when, because this service application does'nt discover immediatly. This will be done by the timer job that will run every 15 minutes (by default), it is called: Application Addresses Refresh Job

So, when one or all of the services for a specific service application are down, you can see it immediately throughout the UI of SharePoint. But the timerjob will discover the services again to reconnect to the first available one. Of course, because it's just a normal timer job, you can reschedule it.